
How to Install a Garage Door Opener: Step-by-Step Guide
Ready to ditch manual lifting and upgrade your garage with a bit of automation? Whether you’re replacing an old system or starting from scratch, learning how to install a garage door opener can save time and money. With the right tools, a bit of patience, and this handy guide, you can tackle the project like a pro.
Not sure if it’s right for you? No problem – A1 Garage Door Service is always here to help if you need expert support.
Garage Door Opener Installation Tools and Materials
Before you begin, gather the tools and materials you’ll need for a safe, smooth install:
Tools:
- Drill and bits
- Adjustable wrench
- Screwdrivers (flathead and Phillips)
- Socket set
- Level
- Step ladder
- Safety glasses
Materials:
- New garage door opener kit
- Mounting hardware (usually included)
- Light bulbs (if needed)
- Safety sensors and brackets
- Extension cords (if outlet is not nearby)
Pro tip: Make sure you read the manufacturer’s garage door opener installation instructions before getting started, because each brand may vary slightly.
Preparing the Garage
Once you have everything ready, prep your garage for the new opener. Clear out the work area, unplug old openers, and secure the garage door in the closed position.
Assemble the Carriage Tube
Start by assembling the rail or carriage tube. This connects the opener’s motor to the garage door. Most kits include a few pieces that snap or bolt together. Lay it flat and follow the kit instructions to ensure a secure assembly.
Mount the Carriage Tube
Once assembled, mount the tube to the motor unit (also called the power head). This part supports the opener’s movement, so be sure it’s level and firmly attached. Use bolts or pins as directed.
Slip the Carriage Over the Tube
Now slide the carriage (or trolley) onto the tube. This is the moving piece that connects the rail to the garage door arm. Make sure it slides freely from end to end.
Mount the Header Bracket
Secure the header bracket to the wall above the garage door, centered horizontally. This bracket holds the front end of the rail. Use lag screws and make sure they’re firmly anchored into framing, not drywall.
Mounting the Opener
Now it’s time to raise the opener and mount it to the ceiling.
Hang Power Unit from the Ceiling
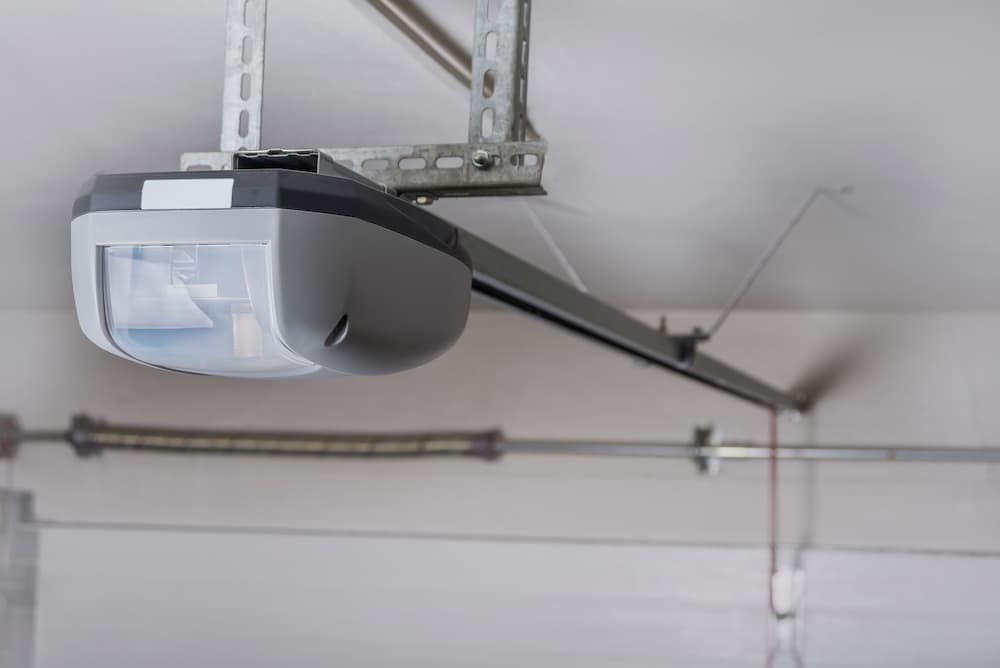
Lift the power unit into place and use angle iron or mounting straps to suspend it from the ceiling joists. The unit should sit level and align with the center of the garage door. Make sure it’s high enough to clear vehicles but accessible for servicing. This step is key when installing a new garage door opener securely.
Connecting the Door
Now that your garage opener is in place, it’s time to link it to the door.
Attach the Bracket That Connects the Carriage Arm
Secure the door bracket to the top of your garage door. Then attach the curved carriage arm to the trolley on the rail and the straight arm to the bracket on the door. Join the arms with a clevis pin, adjusting length as needed to ensure smooth motion. This is how to hook up a garage door opener to the door itself.
Wiring the Opener
Your next step is wiring the opener components:
- Connect the safety sensors to the motor unit using the provided wire.
- Mount the sensors on each side of the garage, about 6 inches above the floor.
- Run the wires neatly along the walls or ceiling, using staples or clips.
- Attach the wall control panel near the entry door and wire it to the motor.
Make sure everything is securely connected. If you’re not comfortable with electrical work, this is a good time to call a pro. When in doubt, safety first.
Programming the Opener Remote
Once your wiring is complete, plug in the power unit and test the opener. Follow the manual to program the remote. Usually, this involves pressing a “learn” button on the opener and syncing it with your remote. This is the home stretch of your DIY garage door opener installation!
Make sure the door opens and closes smoothly. If not, double-check your carriage arm, bracket connections, and rail alignment.
Garage Door Keypad Installation
Want exterior access without a remote? Most openers come with a wireless keypad.
- Mount the keypad outside the garage doorframe (not on the moving door).
- Program it using the instructions provided, which is usually a similar process to syncing the remote.
- Choose a secure passcode and test it several times to ensure it works properly.
Test Safety Device and Garage Door Opener
Now for one of the most important steps – testing your safety system:
- Place a small object (like a piece of wood) under the door. Close the door using the opener. It should automatically reverse when it hits the object.
- Test the photo-eye sensors by breaking the light beam as the door closes. The door should reverse instantly.
- Open and close the door a few times and listen for any odd noises or hesitation.
If your system fails any of these tests, consult the manual or call a professional to ensure everything is safe.
Garage Door Opener Installation Tips
Here are a few extra tips to make your garage door opener installation go smoothly and safely:
- Double-check all measurements before drilling. The opener must be level and centered, and the rail should align with the top of the garage door. If anything’s off, the opener may strain or bind.
- Read the manual – yes, all of it. Every model has small but important differences. Following the manufacturer’s directions is essential for proper function and to maintain warranty coverage.
- Use the hardware that comes with the opener. Substituting screws or brackets may seem harmless, but it can lead to poor support or unsafe installation.
- Keep safety sensors clean and aligned. These sensors prevent injury and damage. A small bump or misalignment can cause your door to stop working or reverse unexpectedly.
- Label wires as you go. It’s easy to forget what’s what when you’re running multiple lines. A bit of masking tape and a marker go a long way.
- Don’t rush. Take your time to avoid mistakes, especially when hanging the power unit or wiring connections.
- Know when to call a pro. If you’re unsure about how to replace a garage door opener or run into electrical or alignment issues, stop and get help. Your safety (and your garage door) is worth it.
Frequently Asked Questions on How to Install a Garage Door Opener
Can I DIY garage opener installation?
Yes, plenty of homeowners can handle DIY garage door opener installation, especially those comfortable with tools and following detailed instructions. That said, it’s not a quick job. Alignments must be precise, wiring has to be safe, and the opener needs to integrate smoothly with your garage door. If you’re short on time or confidence, calling a pro can save you hours (and headaches).
How long does it take to install a garage door opener?
For someone with DIY experience, installation can take 4–6 hours. If you’re learning as you go or working alone, it may take a full day. A professional team can typically complete the job in 1–2 hours.
What tools do I need to install a garage opener?
You’ll need a power drill, socket wrench, screwdriver, ladder, stud finder, and basic wiring tools. Some installations may also require extra bracing or mounting hardware, depending on the ceiling type.
Do all garage doors work with new openers?
Most modern garage doors are compatible, but very old or damaged doors may need repairs or updates before adding a new opener. A quick inspection can help determine what’s needed.
What if I run into problems during installation?
If you’re unsure about how to hook up a garage door opener or get stuck mid-project, don’t hesitate to reach out. A1 Garage Door Service can step in and finish the job safely and efficiently.
Need Professional Opener Installation? Call A1 Garage Today!
If you’re not 100% confident in your DIY skills or want peace of mind, A1 Garage Door Service is here to help. We offer fast, professional garage door opener installation for all major opener brands, with options for smart upgrades, quiet motors, and more. Our certified techs handle everything from removal to setup.
Whether you’re exploring how to install a garage opener for the first time or need a refresh on garage door opener installation instructions, we’re here when you need us. Whether you need a garage door opener installation guide to help troubleshoot a problem or you want full-service support, A1 is your trusted partner for every job.
Schedule your appointment today and enjoy smooth, safe operation from day one.
Image Credit: OttoPles / Shutterstock